Edel Auth for Supabase Setup Guide
Plugin Installation and Verification
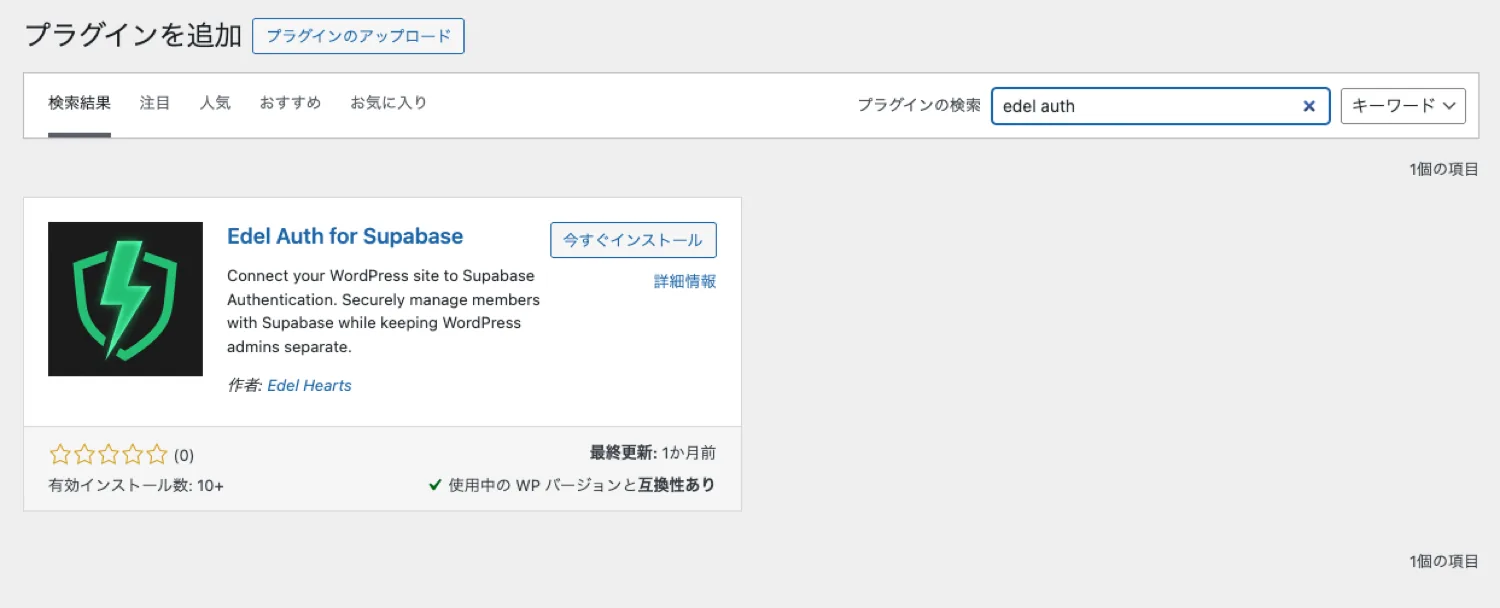
Installation and Activation
- From the WordPress admin dashboard menu, go to "Plugins" → "Add New Plugin".
- Enter "edel auth" in the search box at the top right.
- When "Edel Auth for Supabase" appears, click "Install Now", and then click "Activate".
Checking the Settings Screen
- Click "Settings" → "Edel Auth(Supabase)" in the admin dashboard to open the settings screen.
- The settings screen contains input fields for the "Supabase Project URL" and "API Keys". To obtain these, you first need to prepare your Supabase environment.
Supabase Settings
Creating a Project
If you do not have a Supabase account, please register via the Supabase Official Website.
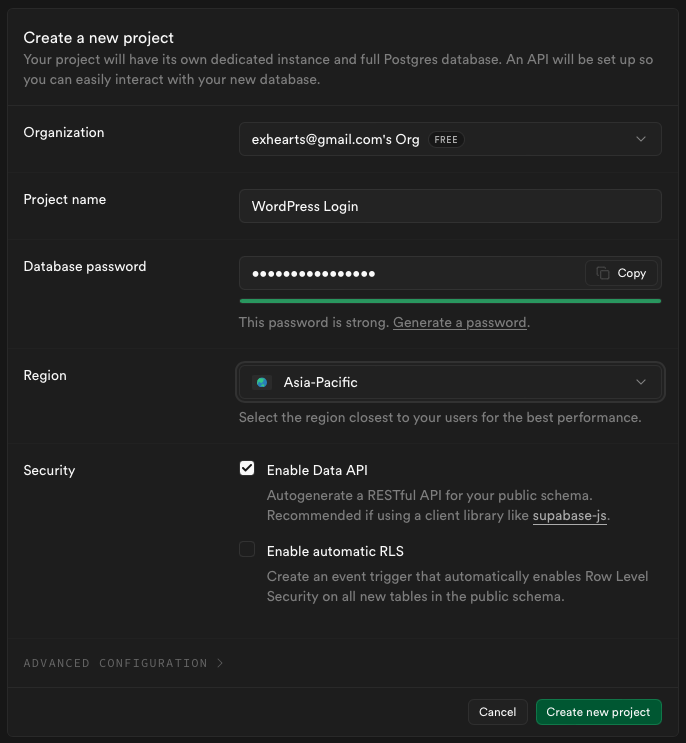
- Access the Supabase Dashboard and click the "+ New project" button in the top right corner.
- Enter and select the following items on the project creation screen:
- Organization: Select the organization created during registration (the default value is fine).
- Name: Enter a project name (e.g.,
My WordPress Site; any name is fine). - Database Password: Enter a strong password for the database or generate one using "Generate a password".
- Region: Select a server location close to you. For Japan, "Northeast Asia (Tokyo)" is recommended.
- Once entered, click the "Create new project" button at the bottom right.
- It may take a few minutes for the project to be built.
Authentication Settings
In your created project’s dashboard, click "Authentication" in the left side menu, then open "Sign In / Providers".
Email + Password
This is enabled by default in Supabase, but please verify the settings just in case.
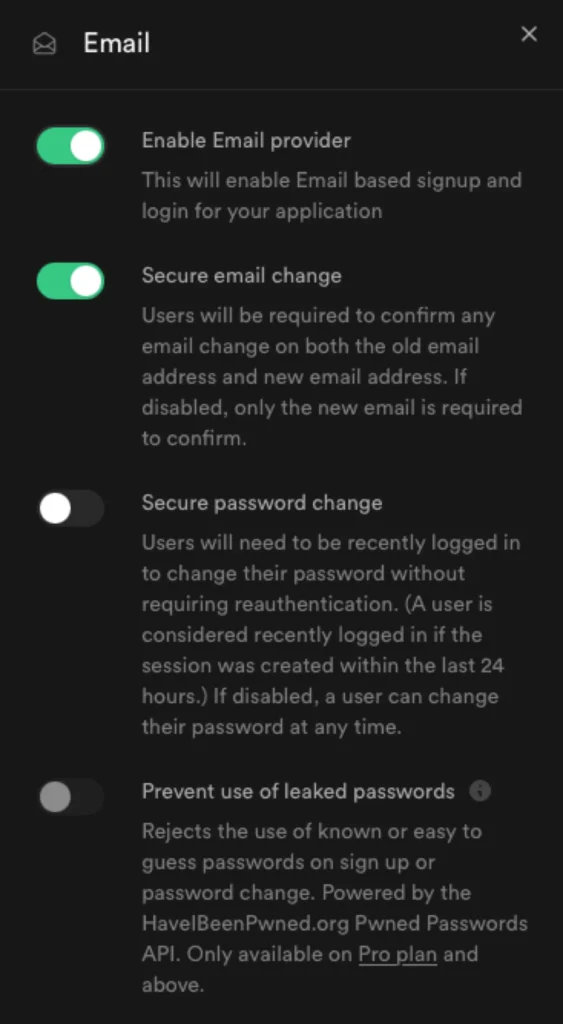
- Click Email from the Auth Providers list to expand it.
- Set Enable Email provider to ON (Green). You cannot log in if this is disabled.
- Set Secure email change to ON (Recommended).
- Enabling this requires approval from both the "old address" and the "new address" when changing emails, preventing account takeover.
- Secure password change can remain OFF (default).
- Set Prevent use of leaked passwords to OFF (default) (This is a Pro plan feature).
- Once confirmed, press "Save" at the bottom right.
Email Auth / Magic Link (Passwordless)
This feature uses the "Email" mechanism, so there is no specific ON/OFF switch for it. However, you must confirm permission for new user registration and disable anonymous login on this screen.
- Click Authentication → Sign In / Providers in the left side menu.
- Configure the User Signups section.
- Allow new users to sign up: Set to ON (Required).
If this is OFF, no one can sign up unless invited by an admin. - Allow anonymous sign-ins: Set to OFF (Recommended).
Since this plugin uses "Email" to link with WordPress users, it does not support anonymous login without an email address. Leaving it ON may cause errors. - Confirm email: Set to ON (Recommended).
When logging in using Magic Links or OTPs, email ownership verification is completed simultaneously.
- Allow new users to sign up: Set to ON (Required).
- If you changed any settings, press "Save changes" at the bottom right.
Google Authentication (OAuth)
Configure settings to allow login and registration using a Google account. This requires configuration on the Google Cloud Platform (GCP) side as well.
- Click Google from the Providers list to expand it.
- Set Enable Sign in with Google to ON.
- Click the copy button next to the Callback URL (for OAuth) at the bottom to copy the URL (you will use this later on the Google Cloud Platform side).
- Access the Google Cloud Console in a separate tab and create (or select) a project.
- Open "APIs & Services" → "OAuth consent screen" from the left menu. The initial setup wizard will appear; proceed as follows:
- App Information:
(1) Enter the "App name" (e.g., your site name).
(2) Select the "User support email".
(3) Click "Next". - Audience:
(1) Select the user type. Select "External" for a publicly accessible site.
(2) Click "Next". - Contact Information:
(1) Enter an email address to receive notifications from Google in the "Email address" field.
(2) Click "Next". - Finish:
(1) Check "I agree to the Google API Services: User Data Policy".
(2) Click "Agree and Continue".
- App Information:
- When the wizard is complete, the "Google Auth Platform" overview (or clients) screen will appear. Click the "Create OAuth client" button.
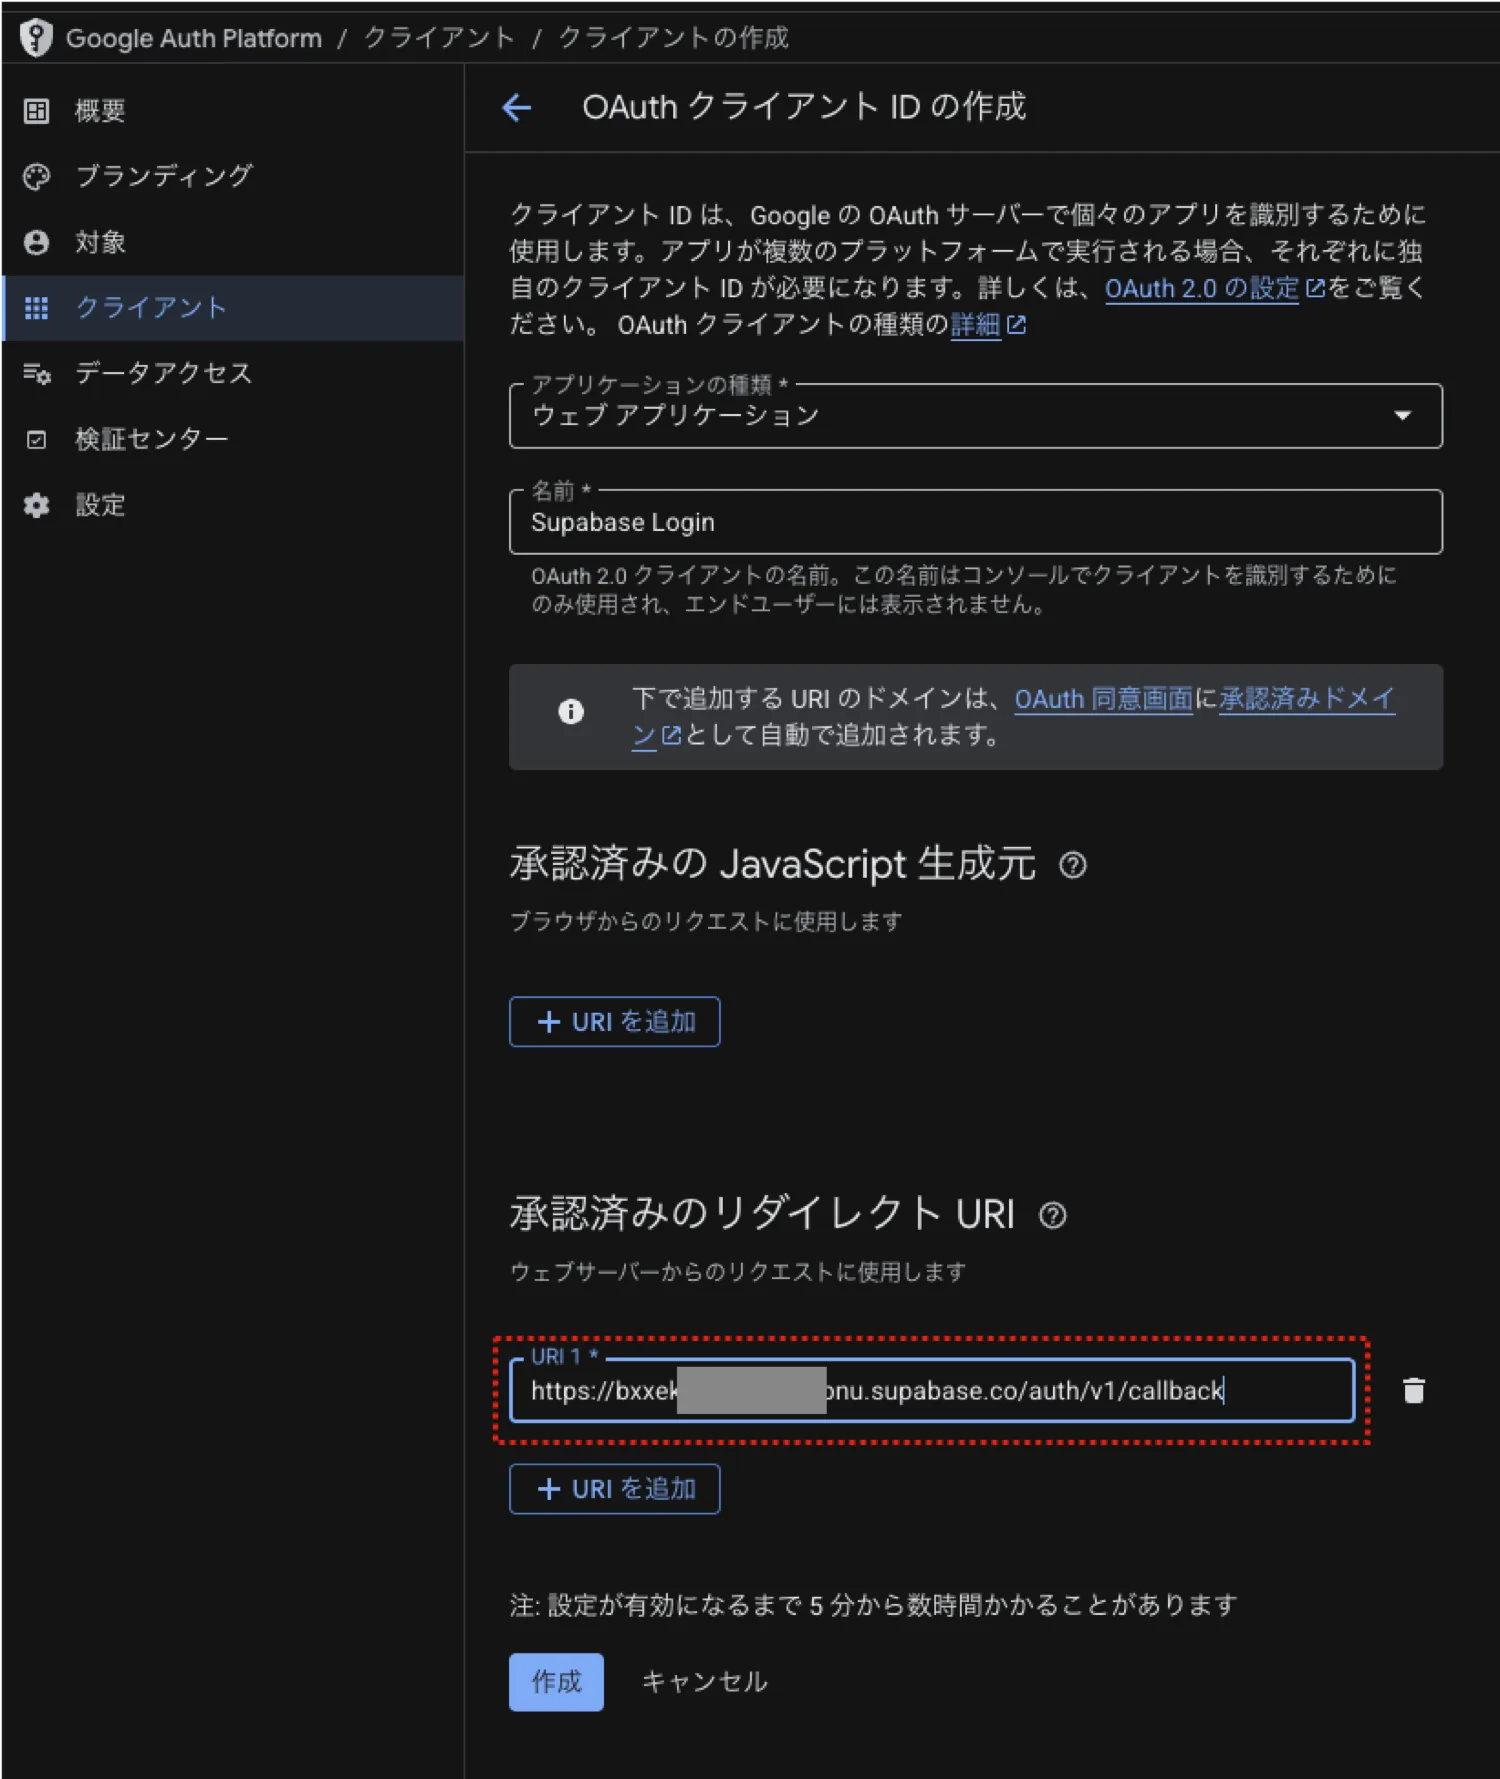
- You will be taken to the Client ID creation screen. Configure it as follows:
- Application type: Select "Web application".
- Name: Enter a manageable name (e.g., "Supabase Login") (Default is fine).
- Authorized redirect URIs: Click "Add URI" and paste the Callback URL you copied from Supabase earlier.
- Click "Create".
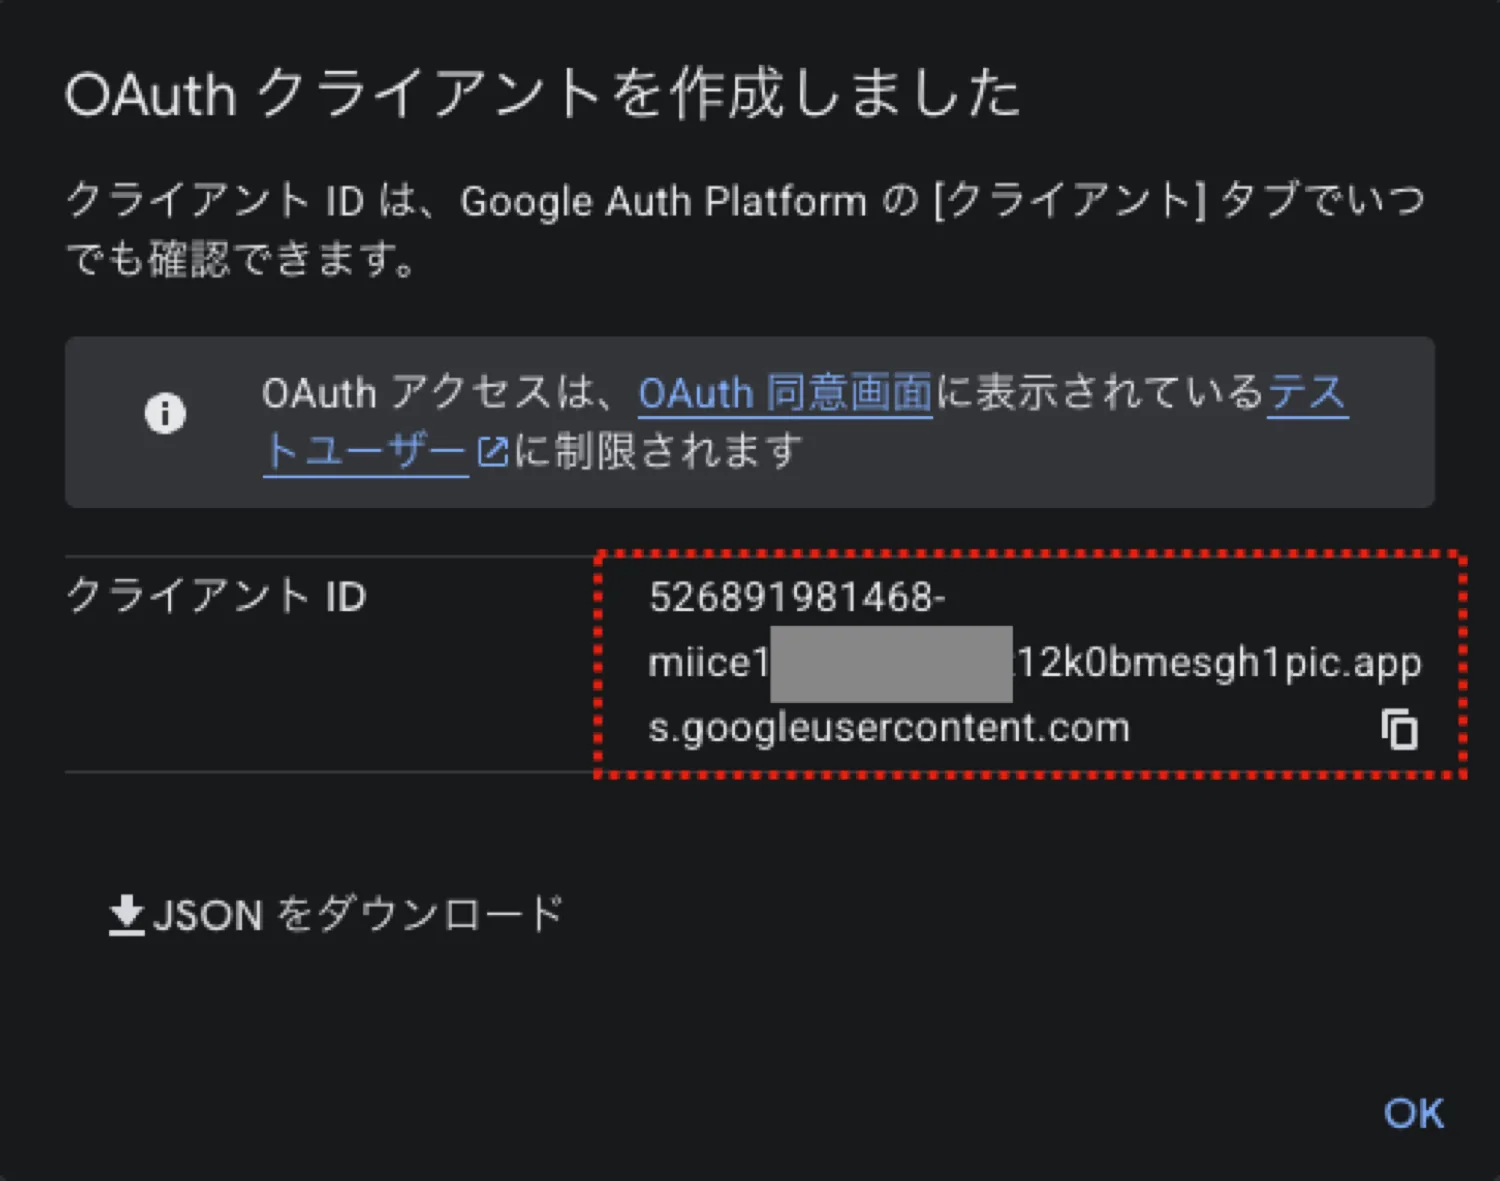
- An "OAuth client created" dialog will appear.
- Client ID: Copy this using the copy button and paste it into the Client IDs field in Supabase.
- Note: Since we will check the secret in the next step, click "OK" to close the dialog here.
-
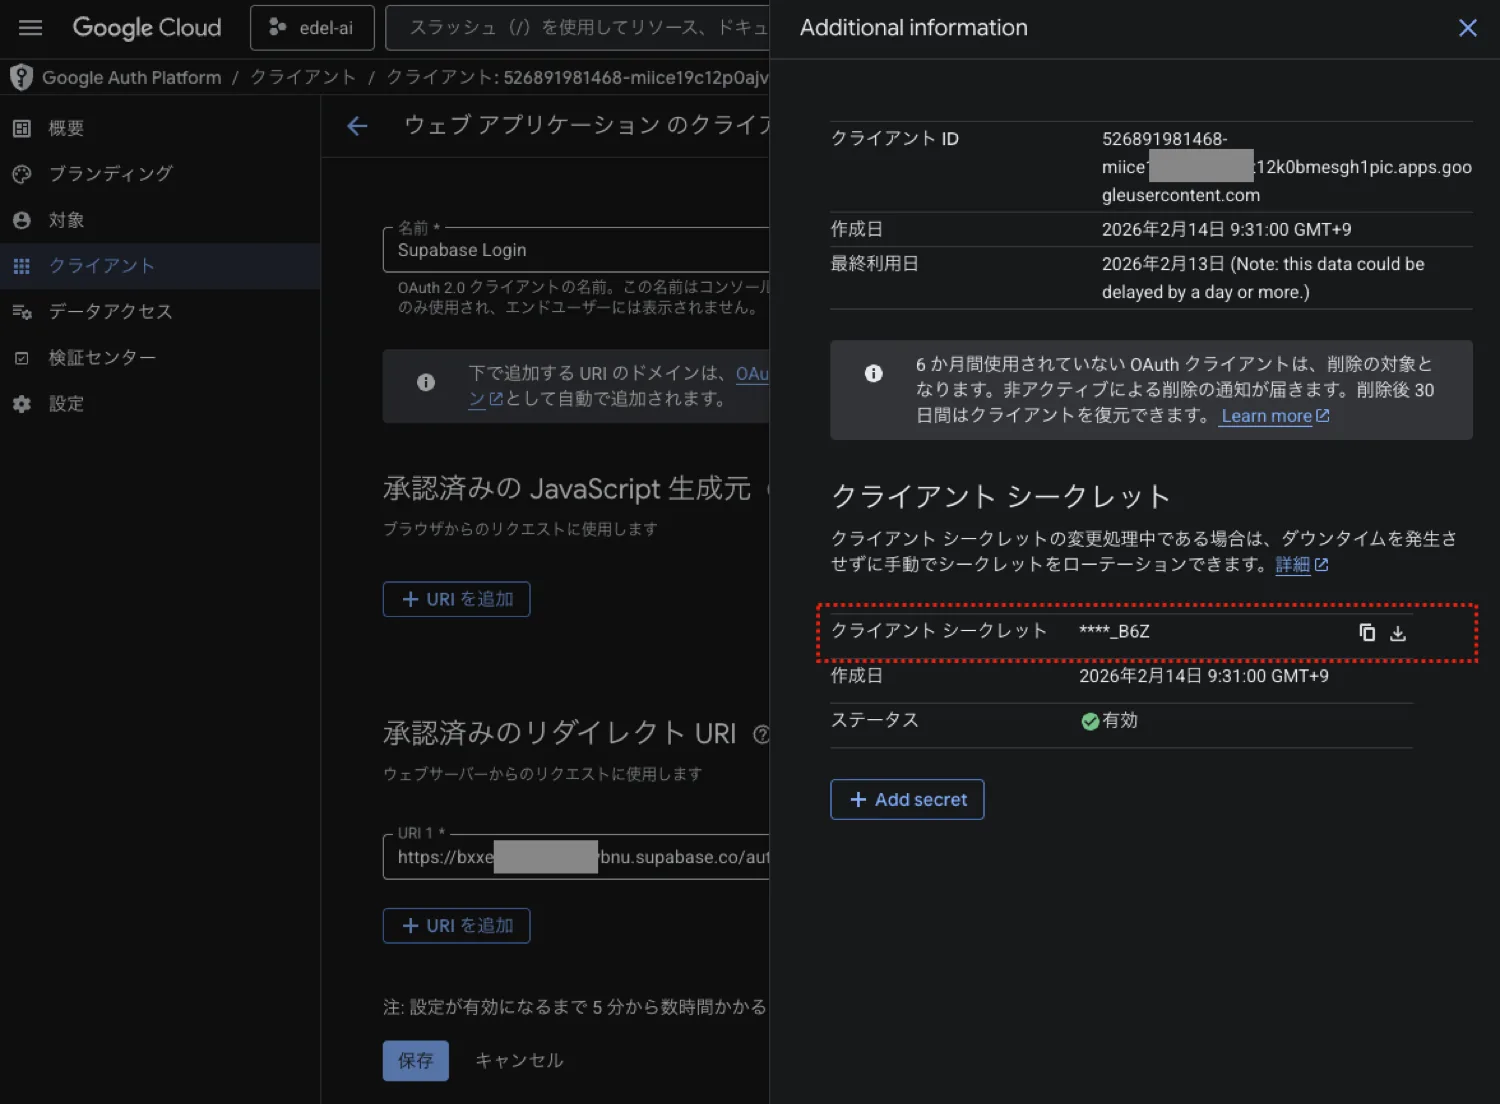
Confirm and Copy Client Secret
- Click the (i) mark (Additional information icon) in the top right corner of the screen.
- A panel will appear on the right side containing the Client Secret.
- Click the copy button to copy it, then paste it into the Client Secret field in Supabase.
- [Important] Publish the App (Remove Test Mode)
- Click "Branding" or "Audience" in the left menu.
- Click the "Publish App" button on the screen and press "Confirm" to move to the production environment (Note: If you forget this, only registered test users will be able to log in.)
- Return to the Supabase screen, check other settings, and save.
- Skip nonce checks: Leave as OFF (default).
- Allow users without an email: Leave as OFF (default) (Email is required for WordPress integration).
- Press "Save" at the bottom right.
[Important] Redirect URL Setting
When using Google Login, you must add your WordPress site URL to the allowlist in Supabase.
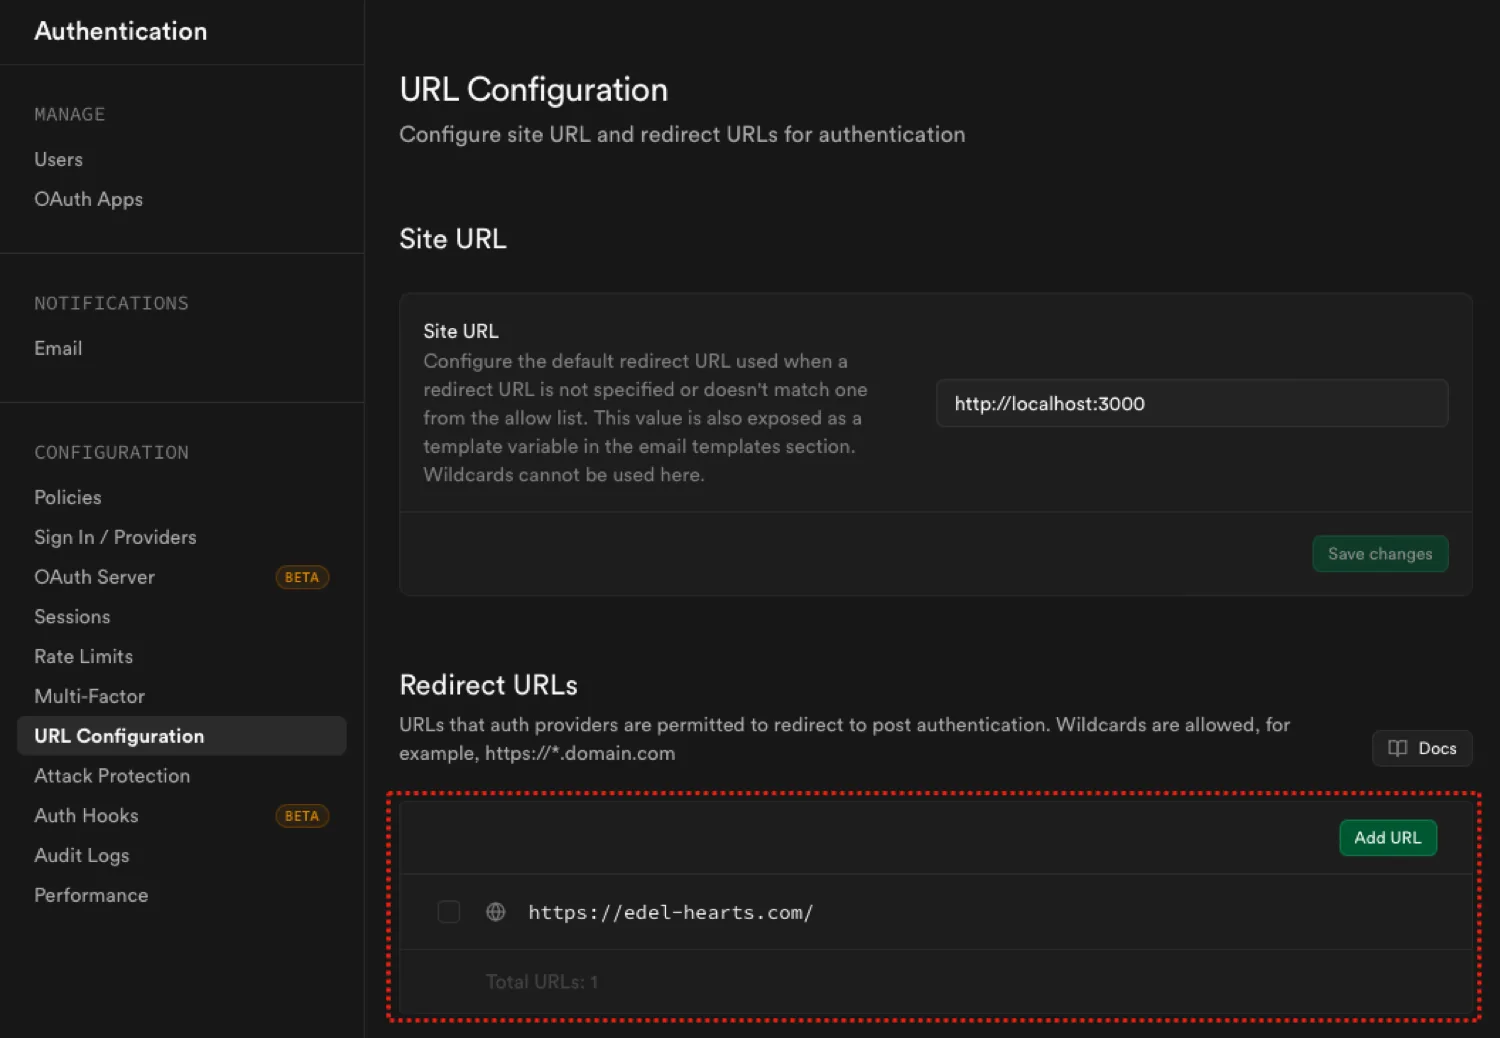
- Open Authentication → URL Configuration in the left side menu.
- Add your WordPress site URL (e.g.,
https://example.com) to the Redirect URLs field, click "Add URL", and save.
Getting API Keys and Plugin Configuration
Obtain the "URL" and "Keys" to connect Supabase and WordPress, and enter them into the plugin.
Getting API Keys and URL (Supabase Side)
In the new Supabase management screen, the URL and Keys are in different locations. Also, this plugin uses the keys found in the "Legacy" tab.
-
Getting the Project URL:
- Click Project Settings (gear icon) at the bottom left of the Supabase dashboard.
- Click Data API under the Configuration section in the left side menu.
- Copy the API URL (
https://...supabase.co) and paste it into Supabase Project URL on the WordPress side.
- Getting API Keys:
- Click API Keys under the Project Settings section in the left side menu.
- Click the "Legacy anon, service_role API keys" tab in the center of the screen to switch tabs.
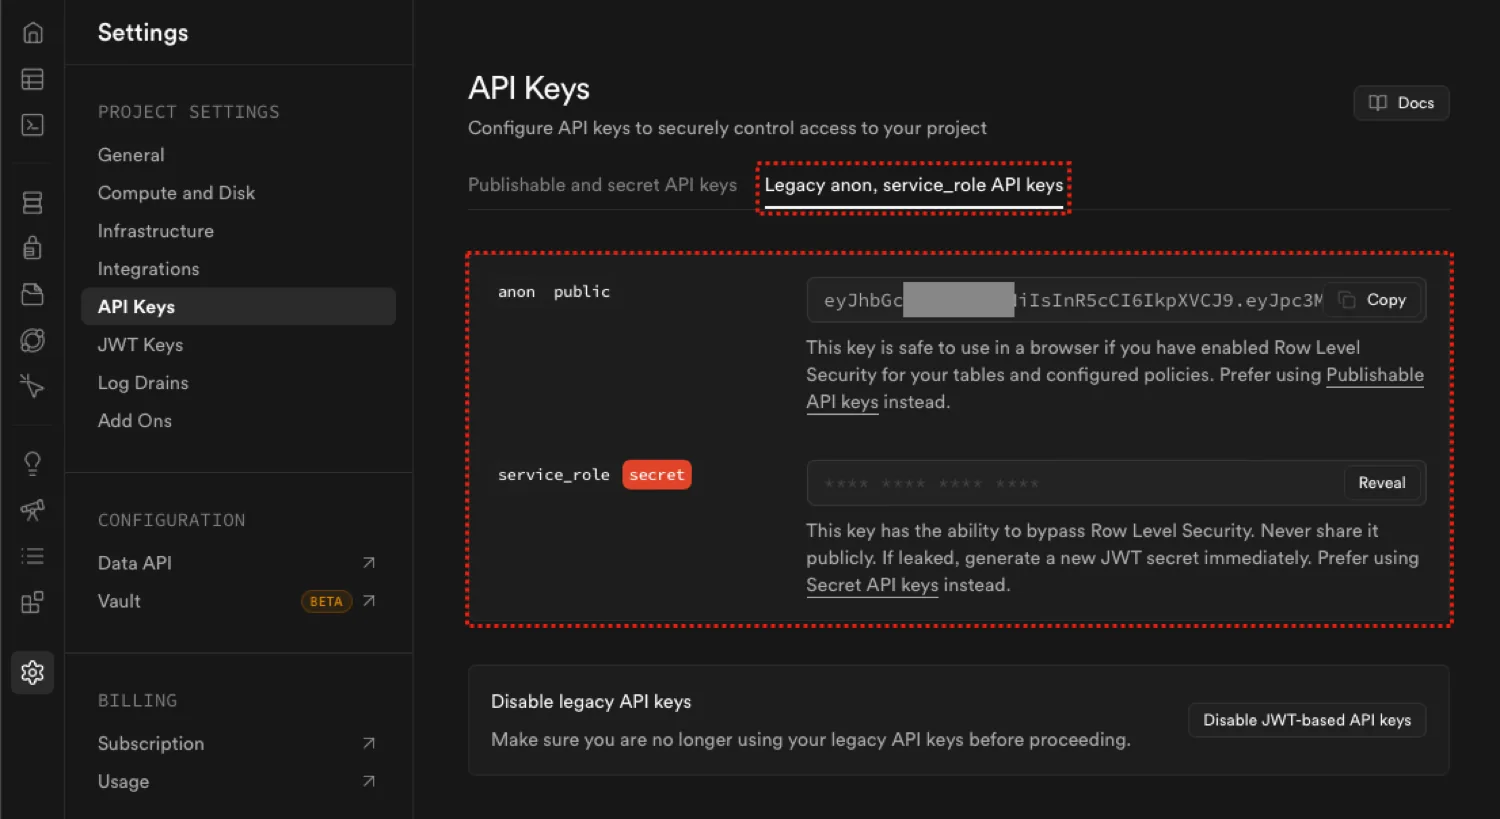
- Copy the key in the anon public field (string starting with
ey...) and paste it into Supabase Anon Key on the WordPress side. - Click the
Revealbutton in the service_role secret field to display and copy the key. Paste this into Supabase Service Role Key on the WordPress side.
・ Caution: Theservice_rolekey is a critical administrative key used for Google user verification and user deletion synchronization. Do not share it with others.
Plugin Configuration (WordPress Side)
Verify that you have completed the input for the following 3 fields using the operations above.
- Return to the WordPress admin screen and open "Settings" – "Edel Auth(Supabase)".
- Check the Supabase API Connection Settings section.
- Supabase Project URL: URL starting with
https://... - Supabase Anon Key: Long string starting with
ey... - Supabase Service Role Key: Long string starting with
ey...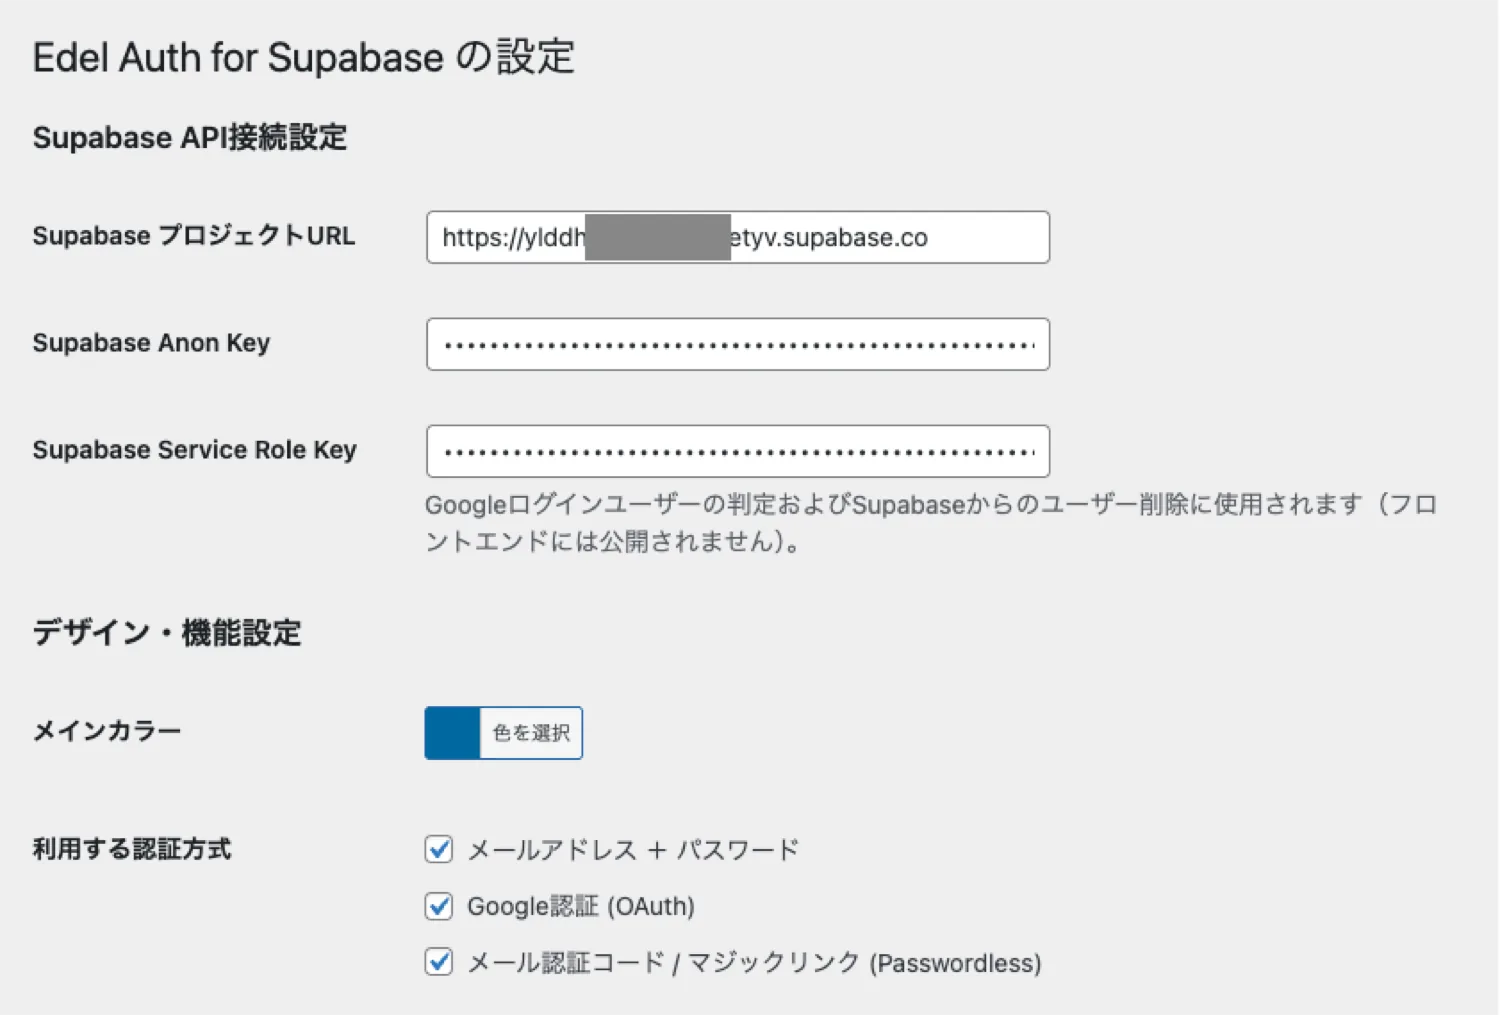
- Supabase Project URL: URL starting with
- Click "Save Changes" at the bottom of the screen.
The connection setup is now complete.
Design and Function Settings
Once the API connection is established, configure the appearance and behavior of the login form.
Authentication Methods
Check the login methods you want to provide to users on the site.
- Email Address + Password: The most common login method.
- Google Authentication (OAuth): Displays a Google account login button.
- Email Auth Code / Magic Link: Displays a button for passwordless login.
Other Settings
- Main Color: Change the color of login buttons and links to match your site design.
- Welcome Email: Edit the content of the email automatically sent from WordPress upon new registration.
- Maintenance Settings (Keep Alive): If using Supabase’s free plan, projects may pause after a long period of inactivity. Enabling this automatically accesses the project once a day to prevent it from stopping.
Placing Shortcodes
Once settings are complete, create fixed pages and paste the following shortcodes to create your login pages.
-
Login Form: [eafs_login]
- Description: Displays a form for logging in via email or Google account.
- Access: Functions only when logged out. If a logged-in user accesses it, a "You are already logged in" message is displayed.
-
Registration Form: [eafs_register]
- Description: Displays a form for creating a new user account.
- Access: Functions only when logged out. A message is displayed if already logged in.
-
Password Reset Request: [eafs_forgot_password]
- Description: A form for users who have forgotten their password to request a reset email.
- Access: Functions only when logged out.
-
Password Update: [eafs_update_password]
- Description: A form for entering and setting a new password.
- Access: Used by users arriving via a link in the reset email (auto-logged-in state) or logged-in users. It does not function if accessed directly without a session.
- Logout Button: [eafs_logout]
- Description: Clicking this logs the user out of both Supabase and WordPress.
- Access: Displayed only to logged-in users. Nothing is displayed in the logged-out state.
Entering the URLs of the pages where these shortcodes are placed into the "Redirect Settings" on the plugin settings screen will ensure smooth screen transitions.
Redirect Settings (URL Paths)
Enter the URL paths (the part after the domain) of the created pages into the plugin settings to link them. This ensures that button links and screen transitions after operations work correctly.
-
Redirect after Login
- Specify the page you want to transition to after a successful login.
- Example:
/for the top page,/my-pagefor a members-only page.
-
Redirect after Logout
- Specify the page you want to transition to after clicking the logout button.
- Example:
/for the top page, or/loginto prompt a re-login.
-
Password Request Page URL (Forgot PW)
- Used as the destination for the "Forgot Password?" link on the login form.
- Important: Accurately enter the path of the page where you placed the [eafs_forgot_password] shortcode (e.g.,
/forgot-password).
- Password Reset Page URL (New PW)
- The destination when users click the link in the "Password Reset Email" they receive.
- Important: Accurately enter the path of the page where you placed the [eafs_update_password] shortcode (e.g.,
/reset-password). If this is incorrect, users will not be able to reset their passwords.
For Developers: How to Use Hooks
You can customize the behavior of the plugin using WordPress Hooks (Actions and Filters). Below are the two most commonly used hooks with code samples.
Action: eafs_after_user_login
This hook is triggered immediately after a user successfully logs in via Supabase. It is useful for updating user meta or syncing data.
-
Parameters:
$user_id(int): The WordPress User ID.$supabase_user(array): User data returned from Supabase.
- Sample Code:
add_action('eafs_after_user_login', function($user_id, $supabase_user) {
// Example: Record the last login date in WordPress user meta
update_user_meta($user_id, 'last_supabase_login', current_time('mysql'));
}, 10, 2);
Filter: eafs_register_user_data
This filter allows you to modify the WordPress user data (such as Display Name or Role) before a new user is created in WordPress via Supabase registration.
-
Parameters:
- $user_data (array): Default WordPress user data (email, user_login, etc.).
- $supabase_user (array): User data from Supabase.
-
Sample Code:
add_filter('eafs_register_user_data', function($user_data, $supabase_user) {
// Example: Set the default role to 'author' instead of the default 'subscriber'
$user_data['role'] = 'author';

// Example: Set the display name using Supabase metadata if available
if (isset($supabase_user['user_metadata']['full_name'])) {
    $user_data['display_name'] = $supabase_user['user_metadata']['full_name'];
}

return $user_data;
}, 10, 2);
Notes and Troubleshooting
About Administrator Login
For security reasons, users with Administrator privileges cannot log in using this plugin’s login form.
Administrators should log in using the traditional WordPress login page (/wp-login.php or /wp-admin).
About Access to Standard Login Screens by General Users
If general users access standard login screens like /wp-login.php and enter their Supabase password, they will not be able to log in (because password information is not synchronized).
To prevent user confusion, we recommend using a plugin like "WPS Hide Login" to change the standard login URL so that general users cannot access it.
Using with Cache Plugins
If you are using cache plugins like WP Rocket, W3 Total Cache, or Autoptimize, be sure to add the login pages (pages with shortcodes) to the cache "Exclusion List". If caching is active, the security token (Nonce) becomes stale, causing login and registration errors.
Unable to Log In with Google Auth
If you encounter errors with Google Login, the "Publish App" step in Google Cloud Platform settings may not be complete. While in "Test Mode", only registered test users can log in. Please check the publication status from the "OAuth consent screen" in the Google Cloud Console.
About Supabase Free Plan Project Pausing
If you are using Supabase’s Free Tier, projects are paused after one week of inactivity. Enabling this plugin’s "Keep Alive" feature helps prevent this, but if you are unable to log in, please log in to the Supabase dashboard and "Restore" the project.